
Friday, December 31, 2010
Friday Freebie from Lettering Delights!
Hurry over and grab these while they are free! Click on the image to go to the site.
Engagement card
My girlfriend's daughter just got engaged. She really likes the Victorian style so I made this up for her engagment card.

 UPDATE: her wedding colors are black, red and white so I had to add some red. I (carefully!) pulled off the figures and added a strip of red to the card. Here is what it looks like now:
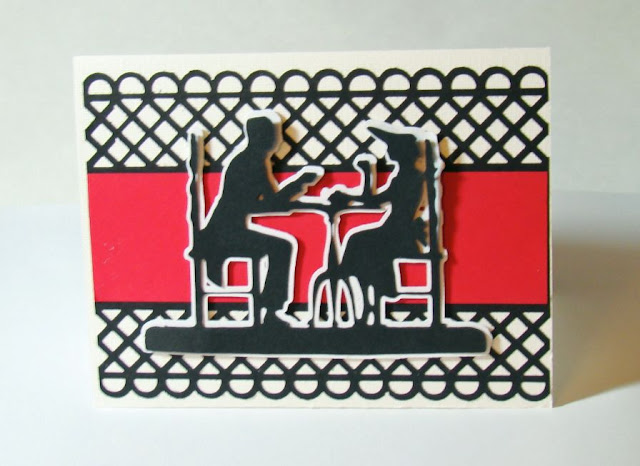 The inside has another image.


I popped out the figures with pop dots, although it is a little hard to see.


Thursday, December 30, 2010
Cards and a MTC border file
Feeling like I am over winter already. I know, I know, it barely started. So I decided to herald the hoped-for spring by making some spring cards.
I found these lovely card blanks at Michaels (8 for $1) and just couldn't pass them up! Here are 2 of the cards. I used a Martha Stewart border punch and thought, "Hey that would be easy to make in MTC!" So a border punch file for you to try!
Here are the bare cards, ready for decoration and creativity!

So the first one was made with the punch and a Letter Delights graphic (one of the free ones that you can download here). Blinged it out with glitter pens. It's a little hard to see the bling but it is there!
 The second is very simple - just a bow and sticker. But I like simple.
 Here is the border punch file for you (can also click on the image) or from box.net here.

I found these lovely card blanks at Michaels (8 for $1) and just couldn't pass them up! Here are 2 of the cards. I used a Martha Stewart border punch and thought, "Hey that would be easy to make in MTC!" So a border punch file for you to try!
Here are the bare cards, ready for decoration and creativity!

So the first one was made with the punch and a Letter Delights graphic (one of the free ones that you can download here). Blinged it out with glitter pens. It's a little hard to see the bling but it is there!


Thursday, December 23, 2010
Christmas Freebies from Lettering Delights!!
Lettering Delights is offering this delightful bundle for FREE to celebrate the season. Be sure to travel here to find it (or search for "Jillustration's Jolly Holiday Bundle" if you get lost). Enjoy!!

Wednesday, December 22, 2010
Shhh...it's a secret!
I found this wonderful recipe for Body Scrub on the Thank You Gifts Blog Hop, just love this! It was on Ruthie's blog here: http://septemberninth.blogspot.com/2010/12/thank-you-gifts-blog-hop.html
I had to make some up and try it out - I can tell you that it really works. So I made up a few for some friends for Christmas - hope they don't see this post until afterwards!
 The one on the left is a brown sugar scrub, on the left the plain version. I am not sure which I like best! They both smell wonderful, with a bit of a tropical flavor. Try it, you'll like it!
Creative Notes: Labels were made in PSE and MTC using a Lettering Delights graphic from the Mulberry Lane Two graphic set and attached with a silver elastic cord. Jars were purchased at Hobby Lobby and flowers were adhered with foam tape to the lid. Green ribbon from HL clearance bin, the iridescent ribbon I think I got at either Walmart or the Dollar Tree.
I had to make some up and try it out - I can tell you that it really works. So I made up a few for some friends for Christmas - hope they don't see this post until afterwards!

Creative Notes: Labels were made in PSE and MTC using a Lettering Delights graphic from the Mulberry Lane Two graphic set and attached with a silver elastic cord. Jars were purchased at Hobby Lobby and flowers were adhered with foam tape to the lid. Green ribbon from HL clearance bin, the iridescent ribbon I think I got at either Walmart or the Dollar Tree.
Tuesday, December 21, 2010
Bow with photo
How would you like to make a personalized bow like this? I made this one for a wedding gift decoration and it was so much fun!

These bows are crazy addictive! Once you start, you just keep wanting to make another one, they are that much fun. Instructions are included in the file (under notes). You can also follow the discussion on the MTC forum here. The link to download the file from box.net here or here.

These bows are crazy addictive! Once you start, you just keep wanting to make another one, they are that much fun. Instructions are included in the file (under notes). You can also follow the discussion on the MTC forum here. The link to download the file from box.net here or here.
Saturday, December 18, 2010

Friday, December 17, 2010
Michael's coupons for Dec 18 thru Dec 24
More coupons in the link, but the 50% off are below as well.
http://mic.michaels.com/20101216WeeklyUSLP.aspx?reg_source=MICMSESB_1_1210&utm_source=MICMSESB_1_&utm_medium=email&utm_campaign=MICMSESB_1_120910

http://mic.michaels.com/20101216WeeklyUSLP.aspx?reg_source=MICMSESB_1_1210&utm_source=MICMSESB_1_&utm_medium=email&utm_campaign=MICMSESB_1_120910
Tuesday, December 14, 2010

Monday, December 13, 2010
Christmas Digital Paper
I shot this photo and applied the star-burst effect last night. It would make a great background for your Christmas pages. Download here. I'f you use it I'd love to see your projects.


I used the bow file from the previous post to make a bow from this photo. I printed it out on a 8.5 x 11" paper, and choose a matching color for the other side. Here is what it looks like after cutting on the cricut:

This is what the bow looked like after assembly.

Gift Bow file for MTC
Do a web search and you'll find several ways to make a gift bow, but I have designed one for MTC. JeannetteC from the forum has allowed me to use her assembly directions and pictures here. Forum discussion is here.
Bow file: download here. This is for 8.5 x 11" paper and will make one bow. This file can also be resized to 12x12.

To assemble:
Method 1: (Starting from the center and building down)
Take a small one and make a loop. Place brad inside it, poking out.
Working with the smallest strips to the longest,
Take a strip, place on the brad with the wrong side touching, bend around and put other end on the brad, again with the wrong side touching. Keep repeating, spacing the pieces out to form the bow.
Open the brad to hold bow in place.


Method 2: (starting from the bottom and building up)
Working from the largest to the smallest,
Take a strip, place on the brad with the good side down, bend around and put other end on the brad, again with the good side down. Keep repeating, spacing the pieces out to form the bow until you have one piece left.
Put the one end on the brad as before, but loop this last one into a ring, then put the other end on the brad.
Open brad to hold bow in place.

Both methods get tricky as the bow gets fuller.
Friday, December 10, 2010
Free SVG files from Lettering Delights


Unofficial FAQ for MTC
This is a work in progress, but I would like to address some Frequently Asked Questions (FAQs) about Make-the-Cut! software and using the Forum. This is by no means complete (nor is it endorsed by the creator of MTC) and will evolve as time goes on.
Getting Started
- Demo Version. What features are available in the paid version (registered version) and the Demo version of the program? The Demo version and the registered version are exactly the same - the only difference is that the Demo version cuts a line through you design when you cut it. From the official website: "The demo of the software is fully functional. When cutting a project, the demo will watermark what it cuts. To remove this watermark on future cutting projects, you must register." (http://make-the-cut.com/Download.aspx )
- Registration Key. Help! I paid for and installed MTC but now I have a new computer. I've lost my registration key, how do I get it again? Go here: http://make-the-cut.com/LostRegKey.aspx and enter your information.
- Version. How do I know what version of MTC I am using? Go to Help-About Make-the-Cut to see what version you are using.
- Version. What is the latest version? The latest official version is always available on the MTC website here: http://make-the-cut.com/Default.aspx Just click the "Download now!" link to get it.
- Version. People on the forum are talking about another version. Where can I get it? If there is a newer Beta (trial) version, it will be available in one of the sticky Announcements at the top of the forum. Look for it!
- Upgrades. How much do upgrades or updates cost? There is never a charge for upgrades or updates. Your initial cost for Make-the-Cut! includes free updates and upgrades for life!
Using the Program
- Tutorials. I would like to read or watch some tuts, where can I find some? There are some on this blog, http://papercraftingwithnelda.blogspot.com/search/label/tutorials, Other sires: Scrappy Dew has some great tuts at http://scrappydew.com/tutorials/files/category-make-the-cut-tutorial.php , also cleversomeday http://cleversomeday.wordpress.com/tag/make-the-cut/ , Nancy at http://www.createcricutdesigns.com/p/free-video-tutorials.html
- Custom Shapes tab. Where is the Custom Shapes tab? I can't find it anymore. This was moved to make more room for other features. Don't worry, it is still available! You can always find it by going to File-Import and choose which feature you want. There are also buttons available, either in the Gear Icon (ver. 2) or in a floating toolbar (ver. 3).
- Cupcake Wrappers. I need help with my cupcake wrappers! Go here to use Jeannette's calculator: http://forum.make-the-cut.com/discussion/comment/96125/#Comment_96125 or here: http://forum.make-the-cut.com/discussion/9538/challenge-twelve-cupcake-wrappers-by-jeannettec/p1
- Print and Cut. Help! I need help with getting my images to cut out well! How did you adjust yours? I found this discussion to be very helpful: http://forum.make-the-cut.com/discussion/9196/fine-tuning-print-and-cut./p1
- Using SVGs. I have some svgs, how do I use them in MTC? Nancy has a great video about this here: http://www.createcricutdesigns.com/2010/12/video-tutorial-cutting-with-lettering.html
Friday, December 3, 2010
MTC Tutorial: Connecting a word that has parent and Child shapes (for FLRN)
This is for one of the MTC forum members who was having a problem with joining words that had parent and child shapes.
Tuesday, November 30, 2010
Monday, November 22, 2010
Awesome Cricut storage solution!
Do you have tons of cricut cartridges and don't know how to store them? Check out the give-away (sign up today!!) at http://jamielanedesigns.blogspot.com/2010/11/scrapn-tote-cricut-storage-giveaway.html Thi smay just be the solution you are looking for!
The give-away os sponsored by Scrap-n-Tote, check them out here: http://www.cricutcartridgestorage.com/index.htm
The give-away os sponsored by Scrap-n-Tote, check them out here: http://www.cricutcartridgestorage.com/index.htm
Thursday, November 18, 2010
Lettering Delights coupon, 40% OFF! (good until Dec 2)

Good until December 2. Remember to put this code in at checkout "GiveThanks"
Click the image or here to start shopping!
Wednesday, November 17, 2010
Envelope A2 for MTC
I made this file in MTC for size A2 envelope (fits a card 4.25 x 5.5"). It has a scalloped edge on the flap and a window for the address. I did not include the background texture because it is a purchased file from Lettering Delights. This paper (sunshine.jpg) is one of the FREE files that you receive if you sign up for Lettering Delights, from the Banner Day Background Paper set. Be sure to click on the banner to the side (the one with the giraffe on it) to get it!
Download here: http://www.box.net/shared/sl9lneb5sj


Monday, November 8, 2010


Wednesday, November 3, 2010
Free Font at Lettering Delights for this month.
This font is being offered at Lettering Delights this month for FREE!
Just click the link above and check out the "Specials" section (under bonus freebies) or do a search for "LDJ Thankful".

Just click the link above and check out the "Specials" section (under bonus freebies) or do a search for "LDJ Thankful".
Sunday, October 31, 2010

Friday, October 29, 2010

Monday, October 18, 2010
Crafting coupons for this week
Michaels's 40% off (restrcitions apply, exp. 10-23-2010): http://www.mommysavesbig.com/printable-coupons/40-michaels.html
Thursday, October 7, 2010
Using Lettering Delights graphics
NOTE: I no longer need to use this method. With the new Trace by color feature, this can all be done in MTC. This post is left as a reference only.
I use PSE 7 a lot with MTC and the Lettering Delights graphics. I don't always need to take them into PSE but if it looks like I am having some trouble pixel-tracing I will pull them over and seperate colors there. Several people in the MTC forum have aksed about this so I thought that I would do a tutorial (I was going to say short tutorial but I am not too sure how short it will be!)
I use PSE 7 a lot with MTC and the Lettering Delights graphics. I don't always need to take them into PSE but if it looks like I am having some trouble pixel-tracing I will pull them over and seperate colors there. Several people in the MTC forum have aksed about this so I thought that I would do a tutorial (I was going to say short tutorial but I am not too sure how short it will be!)
I chose the first graphic because it was the hardest in this set to pixel trace in MTC.
After you open the graphic in PSE, click on the Magic Wand tool (see arrow below).

If you get this error, click OK.

Choose a color to start with. I chose the yellow color. Hold the shift key while selecting every area that is yellow in the picture. When all are selected, hit Ctrl-Shft-J. This will cut your selections and place them on another layer. The graphic will not look any different but if you close the eye on first layer, only the yellow selected areas will be visible in the new layer. Close the eye on the new layer and open it on the bottom layer. Be sure the bottom layer is hightlighted (click on it) and go through each of the colors, placing each on their own layer.

Here you can see that I have several of the colors seprated into layers of their own.


Slide the carets all the way over to the right and everything will turn black. This makes the lighter colors easier to trace in MTC. You do not have to do this with all colors (it is an extra step) but it may help if you are having trouble tracing some of the lighter colors in MTC.

You can also do this to the origianl graphic (before the colors are seperated out) to get a good image to use for a backout of the graphic.

Important: PSE will automatically save to its default file extension, .psd. You will have to change the save option to .jpg by using the drop down menu. In the screen shot below you can see that I have saved several colors already as jpgs.


Open MTC (finally!) and import each color into MTC using pixel trace. You may need to change the threshhold level to get it to trace some of the lighter colors. With the light blue I had to go up to 225 in order to get a trace.

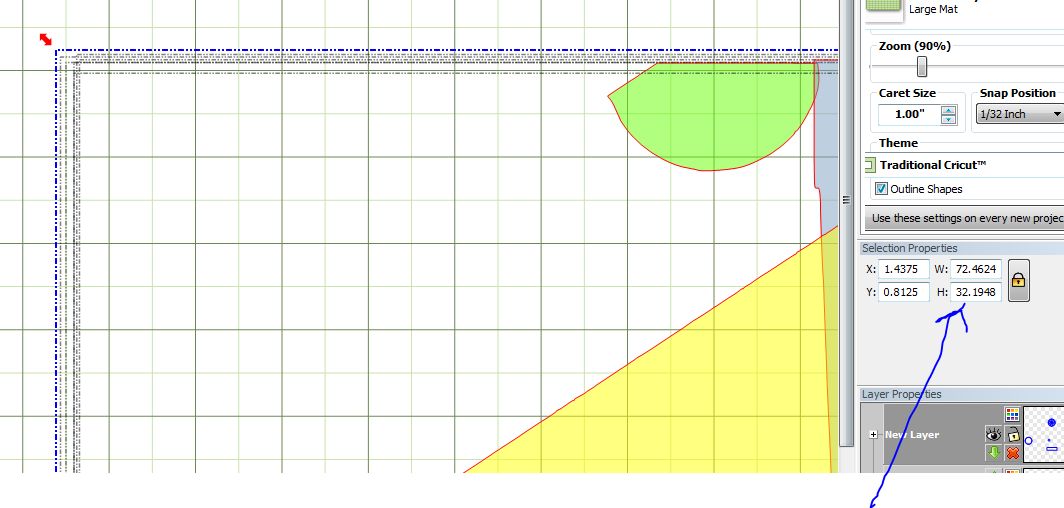
This is important! After you have traced the first color, click off the image to the left so that the trace is no longer highlighted. The caret should be to the left of the image. The images are brought in at a very large size and we want to stack them so that we can reduce them in size together so that they are proportionate. This will help with that process.
The first arrow shows the caret, the second arrow shows the bounding box for the light blue color trace.

Bring in each color. With this graphic there will be 9 traces (the blackout, the colors and white because there are sections that need to be cut as white)
As you bring them in remember to keep them stacked on top of each other. Before tracing the next color, click off the color to the left so that the caret is seen. This screen shot shows 1) the caret, 2) first color traced, and 3) second color traced.

After you have traced all the colors, you can assign each trace a layer and a different color. Then Select all and reduce the overall size of the graphic. I choose to change the height to 5" (Be sure the lock is locked)


I wanted the blue house shape to be without cutouts for the windows so I removed them by welding in a square from Basic Shapes.


The windows (white behind the pink) were not square so I used Basic Shapes to even them out.


Subscribe to:
Posts (Atom)